
Arizona is full of hiking locations, this was my first time hiking Camelback Mountain. Since moving to Arizona from New York in 2013, my wife and I have done some hiking and exploring around the state. We would like to do more and have now made a conscious effort to get out and do more and really see what this state and surrounding areas has to offer. This past weekend, we took a hike not too far from our house up Camelback Mountain. We have driven by it many times and always said we wanted to do it and it has just never happened.
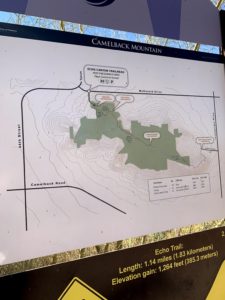
So a little about Camelback. It is in Phoenix and gets its name from the shape, looking like a camels hump. There are two trails, the Echo Canyon trail (the one we did) and the Cholla trail (this one is currently closed). The Echo Canyon trail is 1.14 miles each way and is considered a very difficult hike with an elevation gain of 1264 feet. The trails start at opposite ends of the mountain and meet at the summit. For our hikers out there that like to hike with their pets, dogs are not allowed on the mountain. Below are pictures of the signs at the start of the trail showing the length, elevation and the map to the top.

Preparing for hiking Camelback Mountain
Preparing for the hike is one thing to do in Arizona, especially when hiking in the summer! We planned to get out there early and be done before the heat got too intense. We filled up our Camelbak packs with water the night before and left them in the fridge to get nice and cold. We also got bagels to get a little extra energy in the morning. One thing I wish we knew or read about was getting gloves for the hike (I will tell you more about why in a bit). I had on a trail running sneaker which is a little grippier and my wife wears Reebok all terrain shoes which I don’t believe they make anymore. We woke up about 4:30am got dressed, grabbed our packs and headed out on our excursion. We got in the car, loaded up waze for the Echo Canyon trail head made the trip over.
Getting started
We got there early enough that we were able to park in the parking lot and walked over to the trail head. If you get there early enough, you can find a box of bananas that are put out for the hikers to take either to start off the hike with a bite or to eat at the top for some energy for the return trip. Camelback is a busy mountain so there will be a lot of people hiking around you. There are a lot of spots that are great to take a pause and snap some pictures so be sure to have your smartphone or a camera with you.
The climb
The trail begins with a nice incline and then you hit up some railroad tie steps for a little bit. This isn’t too bad of a start for the hike and then you get to the first section with a railing to hold on to. It looks very daunting, like natural steps that vary in shape and size. Once you are up the rail section, you hike for a little bit through regular terrain until you come to your second rail section. This one looks very daunting because it is like a climb right up smooth rocks but some advice from another hiker to stay to the left was great and we were up it in no time. The third major section is basically a rock climb to the top. You will hop onto, climb over and work around varying rocks that are all over the trail making your way to the summit. For us this was the most difficult part of the trail, not because of the terrain being exceptionally hard but because you really should have gloves to protect your hands. We went without them and our hands got chewed up from the rock (gloves also come in handy on the way down because those railings get friggin hot!!!!!!!). Once you make it to the top, you definitely feel a sense of accomplishment and can really enjoy the views from the top. You will see a bunch of hikers up there, some will have tripods and crazy ass cameras taking some amazing photos or some people doing yoga poses. We just kind of looked around, facetimed some family to show them the view took some gulps of water and prepared for our trip back down.
Thoughts and needs
So looking back on this hike, it was a very challenging one for us. We were glad that we completed it and got some great pictures from the trip. You can check these out on our instagram. Bring plenty of water when you go! This isn’t a walk in the park, this is a serious hike. We saw the rescue helicopter flying by looking for stranded hikers. I would recommend a Camelbak pack or any pack with a water bladder in it. Also, bring some gloves to protect your palms! Next time we go, I would like to have a gopro with me to get a nice video of the hike. We are looking forward to doing more hikes soon, so if you are interested in hiking pictures and articles stay tuned right here to Culture Splat!
This was our experience hiking Camelback Mountain in Arizona, I hope you enjoyed it and our pointers help you out if you choose to make this hike! Comment below on your experience with hiking Camelback Mountain or if you would like to see us do any other hikes, you can also hit us up on our Twitter account by clicking here.